Back to the manuals overview
Manual credits
This manual was written by simbox
Device: FRITZ!Box 7490, 7390, 7360, 7340, 7270 and 7170
About the device
More power for your home network: perfectly equipped for impressive performance on your internet connection and for the many demands of a home network.
The FRITZ!Box covers all your communication needs with fast WLAN, a high-end phone system, answering machine and media server.
DSL, WLAN, DECT, USB, telephony (POTS, ISDN and VoIP), media server and more...
The FRITZ!Box delivers impressive performance on your home network — on a DSL, VDSL or cable connection alike.
With fast WLAN N, gigabit LAN (73 series) and USB ports, you're always well connected on your home network and the internet.
Maximum phone comfort
All your phones can be connected to the FRITZ!Box. That way you stay up to date on calls and voicemails even while on the go.
The answering machine and fax function are a handy bonus.
Introduction
Is your FRITZ!Box already connected to your internet connection?
Then skip ahead to 'Configuring the FRITZ!Box for telephony'.
There are 2 ways to connect the FRITZ!Box correctly.
If it was supplied by your internet provider, it's usually connected directly via the DSL/Tel port, in which case no network configuration is needed.
In all other cases, the FRITZ!Box isn't the modem or router itself — it's connected via the LAN 1 port, with that port used as the WAN (Wide Area Network, i.e. internet) connection.
The differences are explained in more detail — for example — on this site: connecting a FRITZ!Box, which falls outside the scope of this manual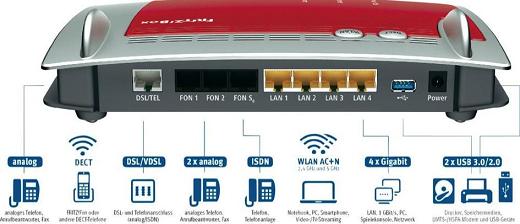
Connecting it
1. Connect the FRITZ!Box to the mains power and connect your computer/laptop to the FRITZ!Box (wired via LAN port 2, 3 or 4, or wirelessly).
2. Connect your cable modem (or other modem/router the WAN signal comes from) to LAN port 1.
3. Open your browser (Internet Explorer, Firefox, Safari, etc.) and go to: fritz.box or 192.168.178.1 or http://169.254.1.1
TIP: if this is the first time you're starting the FRITZ!Box, a setup wizard may launch. Follow it and complete all the steps. Then continue with the next step.
4. The FRITZ!Box configuration page appears. Go to menu [Settings] ] [System] ] [Expert Settings] and enable the [Expert Settings] option. Click [Apply] to save the change.
5. In menu [Telephony] ] [Regional options] you can choose [Other country] or [Netherlands]. Depending on your provider and telephony setup (landline, VoIP-only, mixed), one setting or the other may give the best results. We recommend the [Netherlands] setting. Click [Apply] to save the change.
Which devices can you connect
FRITZ!Box 7170: 3x analogue and ISDN
FRITZ!Box 7270: 2x analogue, ISDN and DECT
FRITZ!Box 7340/60: 2x analogue and DECT (no ISDN!)
FRITZ!Box 7390: 2x analogue, ISDN and DECT
Analogue: these are the old, standard handsets.
ISDN: up to 8 digital devices with support for multiple numbers. This often makes it possible to tell incoming lines apart.
DECT: up to 6 cordless phones, often with a few special features. Think of the FRITZ!Fon, for example, which lets you — among other things — read RSS news and send short emails.
Manufacturers like Siemens, Swisscom, Tiptel and many others also offer ISDN+DECT devices that can distinguish up to 10 numbers from each other,
just like with ISDN, this makes it possible to answer each number under its own name. Handy if you run a few small businesses under one roof, or want calls to ring on separate devices.
The possibilities are too extensive to summarise here!
Configuring the FRITZ!Box for telephony
Once you've successfully connected the FRITZ!Box and configured it for internet access, you can register your CheapConnect account in the FRITZ!Box and connect your phone equipment.
To make calls over the internet, you need one or more SIP accounts.
Make sure you have your CheapConnect account details from our website on hand — they contain all the account information you need.
You only need three things to register a VoIP account:
SIP server: sip.cheapconnect.net
Example: (check your account for the correct details!)
SIP username: 77707005239
SIP password: wachtwoord123
7. On the overview page, choose [Telephone Numbers] or [Telephony].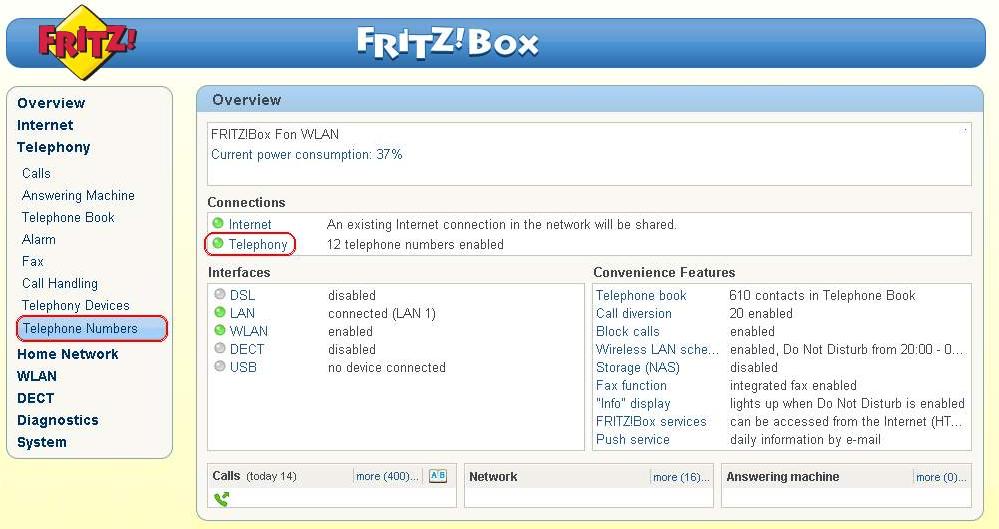
8. In the left-hand menu, choose [telephony] ] the [Internet Telephony] option.
9. To add an account, click [New Internet Number]: 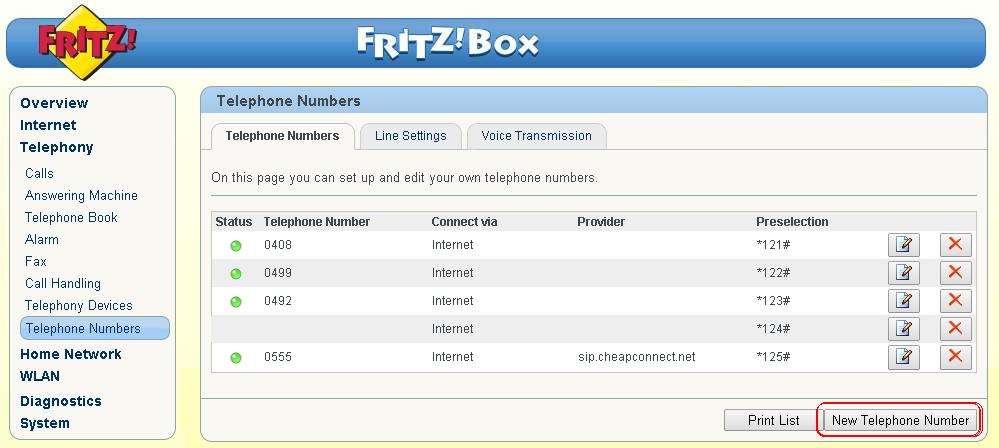
10. Fill in the page as shown in the example below:
Notes:
- You don't need to fill in the area/country code fields separately; just always use the full phone number.
- It can also be handy to set the phone number as the display name.
11. Click [OK] and your account details are saved.
Congratulations, you can now make VoIP calls!
For the real hobbyists
For flawless operation of your FRITZ!Box, it's important that you use the supplied cables.
The models ship with a Y-cable with 3 ends: one connects to the FRITZ!Box (DSL/TEL port) and the other two go to your ADSL splitter and/or NT1 box.
Several models ship with small coupling blocks meant for connecting the FRITZ!Box to your ADSL splitter or NT1 box.
Use the grey and black coupling blocks respectively to connect to the grey and black ends of the Y-cable, so it fits the splitter (small or large connector).
- If you have an analogue phone line, you can connect both ends of the Y-cable to both sides of the ADSL splitter (check the markings on the Y-cable for DSL and telephony, and match them to the ports on your splitter).
- If you have an ISDN phone line, connect one end of the Y-cable to the modem/DSL side of your ADSL splitter. The other end (telephony) goes to your NT1 box.
If you have experience with this, it's also fine to make the cable yourself. Work carefully, and your own cable will run trouble-free for years.
It's possible to combine all 3 types in a single cable — the pinout for this is as follows: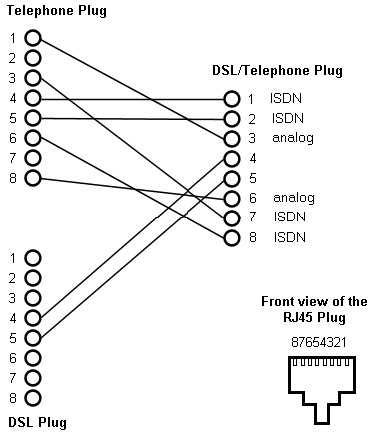
AVM's website can be found at avm.de.
You can find manuals on the following sites: Manuals in German or English
AVM's site also offers various apps in Dutch, English and German.
Support is also available in Dutch, English and German.
Manual credits
This manual was written by simbox

